3 Ways to Create Portal Users in Salesforce in 2026

Granting customers, partners, or volunteers the right level of Salesforce access can feel tricky at first. Between license limits, sharing rules, and profile settings, creating a single portal user often spawns a pile of questions.
This article breaks the task into three clear paths you can pick from, depending on your use case and volume. Follow along and see how each option keeps data secure while staying admin-friendly.
Table of Contents
Use Salesforce’s UI
Handle every step inside Salesforce; you won’t need code or downloads.
1. Make sure the portal is turned on
- In Setup, search for “Digital Experiences” (older orgs may list “All Sites”).
- Click “Settings,” then tick the box for “Enable Digital Experiences.”
- Pick a domain name if prompted and save. Salesforce may take a minute to finish.
2. Confirm you have the right licenses
- Stay in Setup and enter “Company Information” in the search bar.
- In the Licenses section, look at “Customer Community,” “Partner Community,” or “External Apps” to see how many are still available.
If you’re out, you’ll need more licenses before adding new users.
3. Create or locate the contact who will become the user
- Go to the Accounts tab, open the right account, then the Contacts related list.
- Click “New Contact,” or choose an existing record if it already exists.
Make sure the email address is correct, because the activation email goes there.
4. Turn that contact into a portal user
On the contact record, click “Enable as Customer User” (sometimes phrased “Enable Customer Portal User” or “Enable Partner User,” depending on your site type).
Salesforce then opens the “New User” window for that person.
- Fill in the required fields:
- Username must be in email format and unique across all Salesforce orgs.
- Alias can be short; five letters is enough.
- Choose the correct Community or Portal User License for their role.
- Pick a profile built for external users. Salesforce’s help article “Customer User Profiles” shows the defaults.
- Decide whether to send the activation email now. Leaving “Generate new password and notify user immediately” checked is usually fine.
- Click Save; the contact is now a portal user.
5. Add permission sets, if needed
- Open the new user record.
- In the Permission Set Assignments related list, click “Edit Assignments.”
- Move the needed sets, such as “Customer Community Plus Login” or your custom one, to the Assigned column, then save.
6. Test the new login
- From the user record, hit “Login” (you’ll only see this link if you have admin rights).
- A new tab opens and logs you in as that user. Browse a bit to be sure they can see what they’re supposed to see.
That’s it. Repeat the contact-to-user flow for each new portal user, keeping an eye on license counts so no one gets blocked.
Use Torii
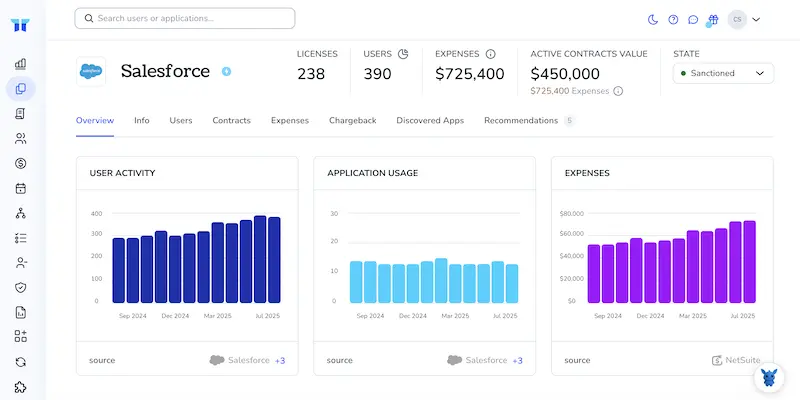
Rather than set up portal users inside Salesforce, you can hand the job to Torii, a SaaS management platform. The SMP dashboard shows every SaaS app in one place, so you can automate provisioning, track licenses, and handle other admin chores.
With Torii, the process runs automatically when a trigger fires, such as a new hire, departure, or renewal milestone. Removing the manual steps saves time and cuts down on mistakes.
To set up portal users in Salesforce through Torii, follow these instructions:
1. Sign up for Torii
Contact Torii and request a complimentary two-week proof-of-concept.
2. Connect your Salesforce account to Torii
After Torii is live, link your Salesforce org to the platform. Step-by-step guidance lives in the Salesforce integration article.
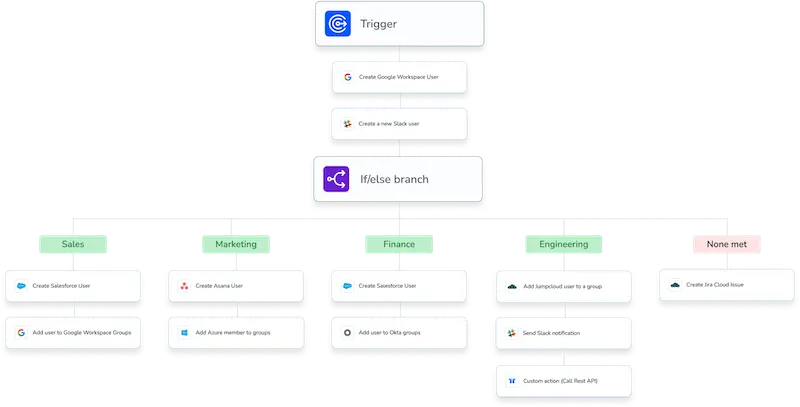
3. Create a Torii workflow for Salesforce
Inside Torii, open the Workflows tab, choose the trigger you need such as an employee status change, and add an action to create portal users in Salesforce. When you save, the workflow runs each time the conditions are met and updates Salesforce without extra clicks.
Use Salesforce’s API
You’ll use Salesforce’s REST API to create a contact, turn that contact into a portal user, and make sure the new user can log in. No clicks, only API calls.
1. Collect the right IDs
Locate the Experience Cloud (or legacy portal) profile that matches the license you’ll assign. Call the REST endpoint
GET /services/data/v60.0/query?q=SELECT+Id,Name+FROM+Profile
Store the ProfileId. The profile must belong to the same portal license you purchased, such as Customer Community.
- Get or create an Account that the new user should belong to. You only need its
Id. - If you expect to grant extra permission sets, note those
PermissionSetIds now with
GET /services/data/v60.0/query?q=SELECT+Id,Name+FROM+PermissionSet
2. Create the Contact (skip if it already exists)
POST /services/data/v60.0/sobjects/Contact
{
    "FirstName" : "Jamie",
    "LastName" : "Rivera",
    "Email" : "[email protected]",
    "AccountId" : "0018b00002ABCDe"
}
The response includes a ContactId, and you’ll reference that value in the very next API call.
3. Insert the portal User record
POST /services/data/v60.0/sobjects/User
{
    "Username" : "[email protected]",
    "Alias" : "jriver",
    "Email" : "[email protected]",
    "TimeZoneSidKey" : "America/New_York",
    "LocaleSidKey" : "en_US",
    "EmailEncodingKey" : "UTF-8",
    "LanguageLocaleKey" : "en_US",
    "ProfileId" : "00e8b00000123XYZ", // portal profile
    "ContactId" : "0038b00004ABCDe",
    "IsActive" : true
}
Salesforce links the user to the portal automatically because the profile and license are already tied together. The API returns the new UserId.
4. Confirm the user can log in
Run a quick query so you can confirm the login status before handing credentials to the customer:
GET /services/data/v60.0/query?q=
SELECT+Id,Username,IsActive,ContactId,ProfileId+FROM+User+
WHERE+Id='0058b0000123FGH'
If IsActive is true and the ContactId appears, the user can sign in without any extra setup.
5. (Optional) Add permission sets for extra access
POST /services/data/v60.0/sobjects/PermissionSetAssignment
{
    "AssigneeId" : "0058b0000123FGH", // UserId
    "PermissionSetId" : "0PS8b0000099XYZA"
}
Repeat the call for each permission set you plan to add, and keep the payload identical except for the PermissionSetId value.
That’s it, your portal user is live, created completely through the API without touching the UI.
Torii for SaaS Management
If you’d like to dig deeper into SaaS management, let us know. Torii’s SaaS Management Platform lets you:
- Uncover shadow IT: AI continuously sweeps your organization, flagging unsanctioned apps in real time.
- Slash spending: Reclaim budget by eliminating unused seats and redundant tools.
- Automate joiner/mover/leaver workflows: Take the manual work out of onboarding, offboarding, and other routine IT tasks.
- Receive proactive renewal notifications: Get timely alerts so no contract deadline slips through the cracks.
Torii unifies Finance, IT, and Security data, giving every team the same facts about every application.
To see the platform in action, explore the resources on the Torii site.
Frequently Asked Questions
Salesforce offers three paths for adding portal users: use the native UI to enable a contact, trigger Torii workflows to provision accounts automatically, or send REST API calls that create the contact and user records directly. Choose the route that fits your volume and skillset.
Customer Community, Partner Community, or External Apps licenses must be available. Check Setup > Company Information to see remaining counts before provisioning; if you’re out of seats, purchase more or reassign inactive ones so new portal users can be activated successfully.
Yes. After integrating Salesforce with Torii, you can build a no-code workflow that fires on events like hiring, termination, or contract renewals. The flow automatically creates, updates, or deactivates portal users, ensuring licenses stay optimized without manual Salesforce clicks.
Open the desired Account, navigate to the Contacts related list, create or select the contact, and click \"Enable as Customer User\" (label varies). Complete the New User form, choose the proper license and profile, save, then optionally assign permission sets.
Use three REST endpoints: POST /Contact to create the person record, POST /User to insert the portal user with the correct ProfileId and ContactId, and optional POST /PermissionSetAssignment to grant extra access. Query the User object afterward to confirm IsActive equals true.
Testing with the built-in \"Login\" button verifies that the external user sees only permitted data before invitations go out. It lets admins catch profile or permission errors early, avoiding frustrating activation emails that lead to immediate \"access denied\" messages.
