4 Ways to View All Users in Salesforce in 2026

Finding every user record in Salesforce can feel harder than it should be, especially when profiles, permissions, and sandboxes pile up. As an admin, you just need a clear list to troubleshoot issues, manage licenses, or onboard teammates.
Below, we break down four quick ways to surface every active, or inactive, user record without digging through endless menus. Pick the method that matches your workflow, swap between them on the fly, and keep your org moving.
Table of Contents
Use Salesforce’s UI
You’ll pull up the full user roster straight from Salesforce Lightning. No code and no extra tools, only a few clicks in Setup.
Step 1: Open Setup
- Click the gear icon in the upper-right corner.
- Choose Setup; the page opens in a new tab.
Step 2: Find the Users menu
- In the Quick Find box on the left, type
Users. - Click Users under the heading “Users”.
Step 3: Switch to the All Users view
- Salesforce shows “Active Users” by default. Pick the View dropdown near the top left.
- Select All Users; this list includes active, inactive, and frozen accounts.
Step 4: Adjust filters if needed
- To see only inactive users, click the Filter icon, set “User Status” to Inactive, then Apply.
- For a custom slice, such as users with a specific profile, add another filter for Profile and choose the profile name.
Step 5: Sort, search, or export
- Click a column header, such as Last Login, to sort.
- Use the search bar above the list to find a specific name or username.
- For a quick export, open the gear icon in the list view header and choose Printable View. This opens a new tab you can copy to a spreadsheet.
Step 6: Drill into a user record
- Click any username to open their detail page.
- Review roles, profile, and license info or hit Edit to make changes if your permissions allow.
That’s it, your complete user list shows up in a couple of minutes without leaving the Salesforce UI.
Use Torii
Manually pulling Salesforce user data takes time and clutters your day. With Torii, you don’t have to. The SaaS Management Platform gathers every cloud app in one place so you can see your full stack at a glance.
To see every Salesforce user in Torii, follow these quick steps:
1. Sign up for Torii
Reach out to the Torii team and request a complimentary two-week proof of concept.
2. Connect your Salesforce account to Torii
After Torii spins up your environment, hook up your existing Salesforce instance. Detailed steps live in the official guide: Salesforce Integration.
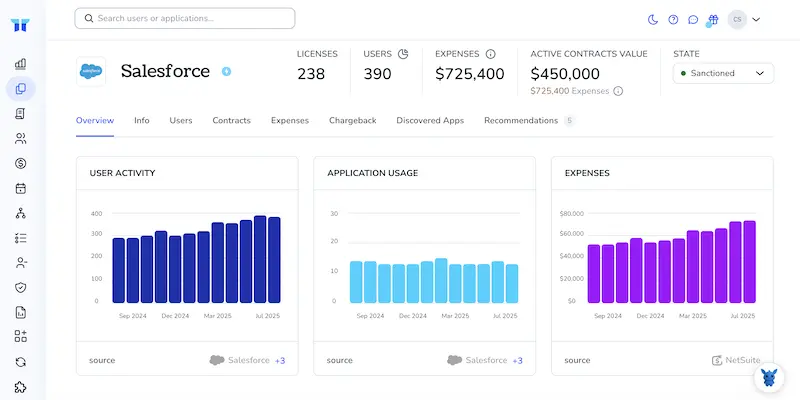
3. Locate Salesforce inside Torii
Type “Salesforce” in the dashboard search bar, then open the app page to view user counts, license allocation, spend, renewal dates, and more.
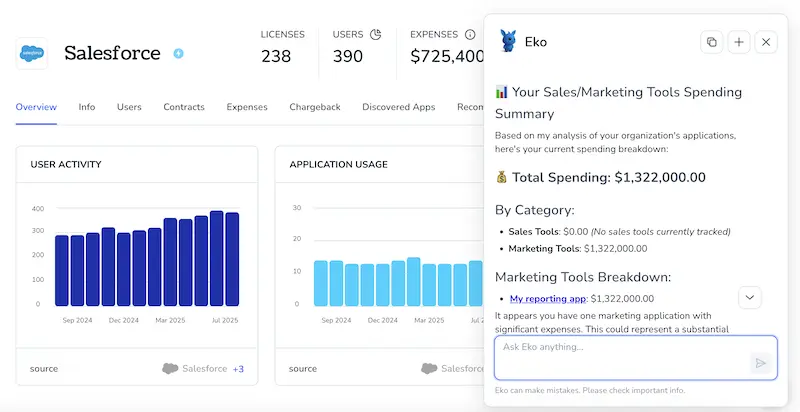
Or, chat with Eko
When you need Salesforce data inside Torii, the quickest route simply is the AI helper Eko. Select the Eko icon at the lower-right corner of the dashboard, enter your request for Salesforce details, and the chat panel returns the data.
Use Salesforce’s API
Here’s the quickest way to grab a full user list with nothing but the Salesforce REST API.
1. Decide on an API version
check the versions that come back from GET /services/data/; then keep the latest one, for example v58.0. Use that version number in every URL that follows.
2. Get an access token
To call the API, you need an OAuth 2.0 access token that Salesforce returns after a quick password grant. From your connected app, send a POST to the token endpoint:
POST https://login.salesforce.com/services/oauth2/token
grant_type=password
client_id=YOUR_CONSUMER_KEY
client_secret=YOUR_CONSUMER_SECRET
username=YOUR_USERNAME
password=YOUR_PASSWORD+SECURITY_TOKEN
The JSON you get back holds access_token and instance_url.
3. Build the SOQL query
Pick and store the SOQL query you want to run against the User object, including every column you might need later.
SELECT Id, Name, Username, Email, IsActive, Profile.Name
FROM User
ORDER BY Name
URL-encode it so spaces become + or %20.
4. Fire the request
combine your instance URL, the API version, and the encoded query into one request path. Then add the token in a header.
GET {instance_url}/services/data/v58.0/query?q=SELECT+Id,Name,Username,Email,IsActive,Profile.Name+FROM+User+ORDER+BY+Name
Authorization: Bearer {access_token}
A simple cURL call looks like:
curl -H "Authorization: Bearer $ACCESS_TOKEN" \
"$INSTANCE_URL/services/data/v58.0/query?q=SELECT+Id,Name,Username,Email,IsActive,Profile.Name+FROM+User+ORDER+BY+Name"
You’ll get a JSON response with records, totalSize, and maybe nextRecordsUrl.
5. Page through large result sets
If nextRecordsUrl shows up, run another GET on that path with the same header:
GET {instance_url}{nextRecordsUrl}
Authorization: Bearer {access_token}
Repeat until no nextRecordsUrl appears.
6. Parse and store the data
Each item in the response array represents a single user object, so pull out the fields you care about before saving. Load them into your app or export to CSV, whichever fits your workflow.
7. Refresh the token when needed
Remember that Salesforce access tokens expire after a set interval. When you hit a 401, repeat step 2 or use the refresh token flow to grab a fresh access_token. All done: no UI clicks, just clean API calls that return every user in your org.
Use Claude (via MCP)
If you prefer, pull the same data straight into Claude with the Model Context Protocol (MCP).
Claude is Anthropic’s AI assistant and an easy alternative to ChatGPT.
To list every Salesforce user from within Claude, do the following:
1. Set up Torii
Complete the earlier Torii steps to link your Salesforce instance to Torii.
2. Set up MCP in Claude
Follow the official Torii MCP instructions together with the related blog post for step-by-step guidance.
Install the Claude Desktop app, then add the snippet below to the claude_desktop_config.json file:
{
    "mcpServers": {
        "Torii MCP": {
            "command": "env",
            "args": [
                "TORII_API_KEY=YOUR_API_KEY",
                "npx",
                "@toriihq/torii-mcp"
            ]
        }
    }
}
Create the required API key in your Torii Settings tab before saving.
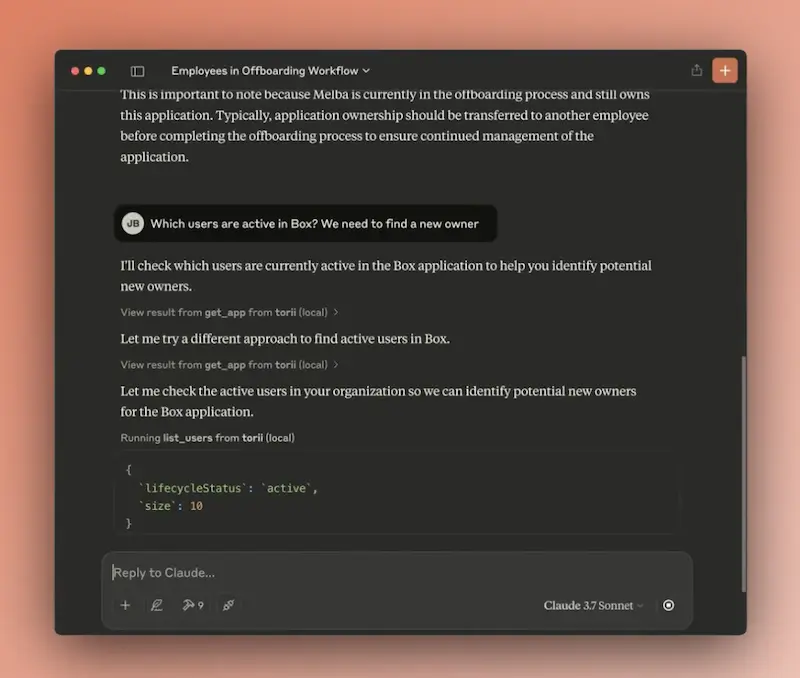
3. Chat with Claude
Once everything’s wired up, open Claude and start talking to your Torii workspace in real time.
Ask about active Salesforce licenses, total spend, upcoming renewal dates, and anything else Torii tracks.
Torii for SaaS Management
Many teams run into hidden costs and compliance gaps once their SaaS stack starts to sprawl. Torii shows you what’s running and where to tighten the screws.
- Uncover shadow IT: Real-time, AI-driven scans spot unapproved apps across the company before they create risk or extra cost.
- Reduce spend: Cut waste by retiring unused seats and merging redundant tools so budgets stay lean and defensible.
- Automate onboarding & offboarding: Hand off joiner-mover-leaver tasks to flexible workflows that save hours and completely shut down human-error headaches.
- Stay ahead of renewals: Receive timely alerts so contract dates never slip past, giving teams room to negotiate or pivot.
Torii unifies SaaS data, letting Finance, IT, and Security work from the same up-to-date record every day.
For a closer look at the platform, head over to Torii and explore the full feature tour.
Frequently Asked Questions
You have four fast options: use Salesforce Lightning Setup’s "All Users" list view, open the user roster in Torii, run a REST API SOQL query, or request the same data inside Claude via Torii’s Model Context Protocol. Switch anytime based on preference.
Yes. In the "All Users" list view, click the gear icon and choose "Printable View". Salesforce opens the roster in a new tab that you can copy directly into a spreadsheet or save as CSV—no scripts required.
In Lightning, press the Filter icon, set "User Status" to Active, Inactive, or Frozen, then optionally add another criterion for "Profile". Apply the filters and the list view instantly narrows to exactly the slice of users you need.
Torii pulls Salesforce metadata through a secure integration, showing active users, seat utilization, spend, and renewal dates on one dashboard. Automated alerts and workflows let IT reclaim unused licenses and complete onboarding or off-boarding tasks without endless reports.
A common query is: SELECT Id, Name, Username, Email, IsActive, Profile.Name FROM User ORDER BY Name. URL‑encode spaces before calling GET /services/data/vXX.X/query?q=YOUR_QUERY, add the Bearer token header, and Salesforce returns every user in JSON.
If the response includes nextRecordsUrl, issue another GET to that path with the same Authorization header. Continue following each nextRecordsUrl until none remains; Salesforce streams the records in manageable chunks so your script never times out.
