4 Ways to Access Contract Details in Intercom in 2026

Digging through conversations just to find a renewal date or payment clause wastes time and frustrates everyone. When you’re juggling support tickets, invoices, and legal checks, every click matters.
This guide shows four fast ways to surface contract data inside Intercom, directly in chat, via the user profile, through tags, and with custom reports, so you can answer questions, approve deals, or flag risks without leaving your workflow.
Table of Contents
Use Intercom’s UI
Here, you’ll use Intercom’s workspace settings to pull up the price, renewal date, and documents tied to your subscription.
Open your workspace settings
- Sign in to Intercom.
- Click the gear icon in the lower-left corner to open Settings.
Go to Billing › Overview
- From the left menu, choose Billing.
- Overview opens automatically. Intercom’s docs label this the “billing overview” page.
Check your plan summary
- At the top, look for “Your plan,” which shows the package name, add-ons, and seat count.
- A usage bar under each item flags approaching overages.
Note renewal and payment details
- In the upper-right corner of the Overview page, find “Next invoice.”
- It lists the invoice date, amount due, and whether you’re on a monthly or annual cycle.
Download invoices or the full contract (optional)
- Under Billing, open Invoices.
- Select the invoice you need and download the PDF.
- For the signed order form or master agreement, open the Documents tab and download the file listed there.
That’s all. You’ll find every item inside the Intercom UI without installing anything else.
Use Torii
Skip the Intercom login and pull contract details straight into Torii, the SaaS management platform that shows every subscription in one place. With everything side by side, you finally have a reliable snapshot of your software stack.
1. Create your Torii account
Reach out to Torii to kick off a no-charge 14-day proof of concept that runs on your own data.
2. Hook up your expense systems & contracts
Once your workspace is live, link your finance tools such as Coupa, QuickBooks, or any other system to Torii. The platform immediately imports the spend tied to your Intercom subscription.
You can also drag and drop contracts directly into Torii; its AI scans each file and grabs the pricing details.
Detailed steps for the Intercom integration are here.
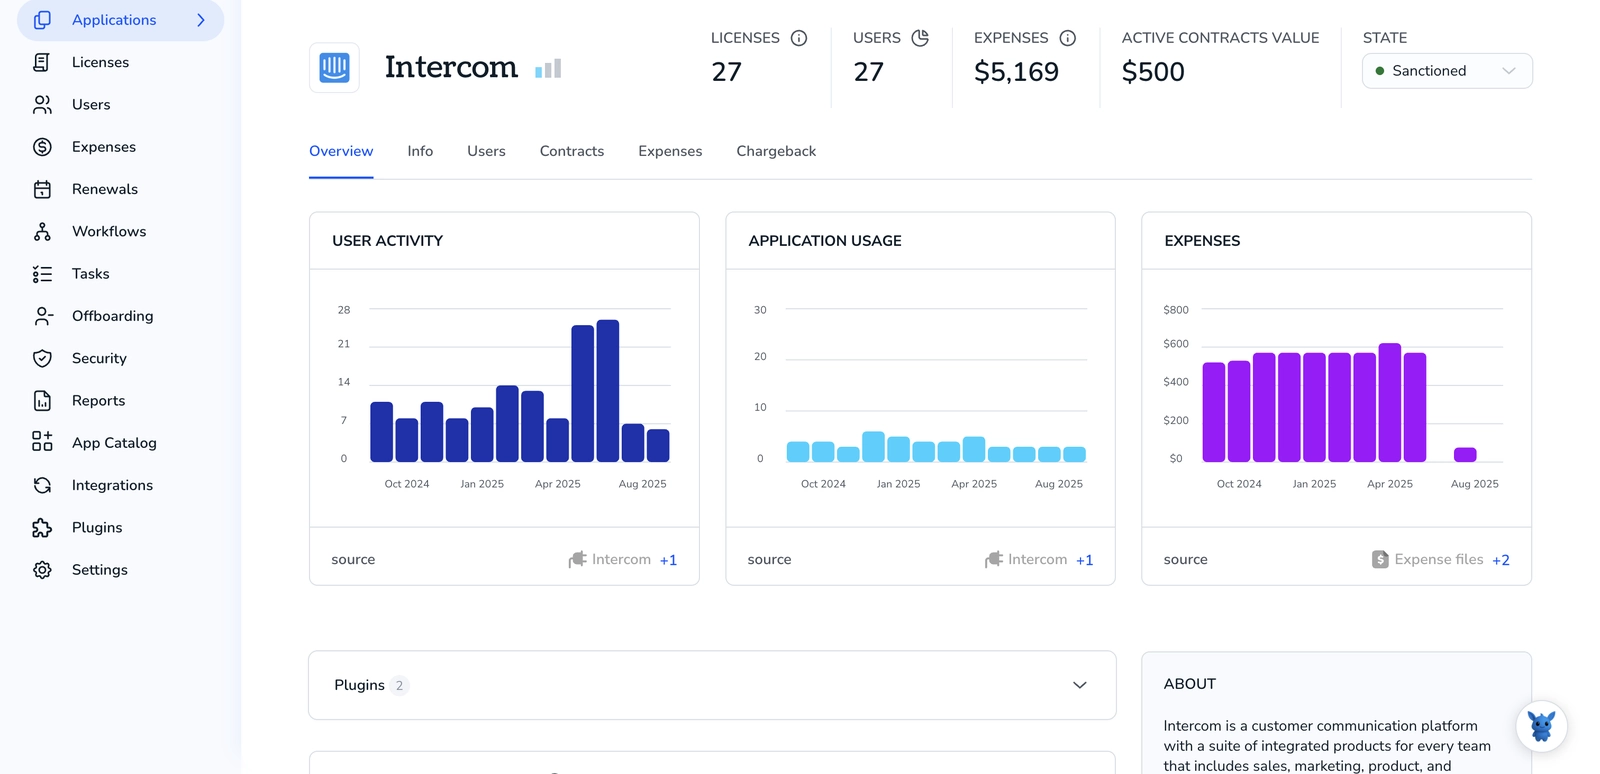
3. Locate Intercom inside Torii
Use the search bar at the top of the Torii dashboard to look for “Intercom.” The app page shows seat counts, total spend, upcoming renewal dates, and other key metrics in one view.

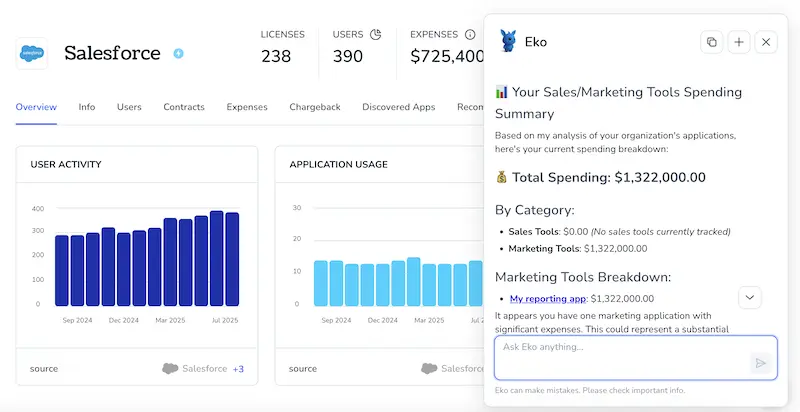
Or, chat with Eko
Torii’s AI helper, Eko, lets you grab Intercom details inside Torii through quick chat commands. Click the Eko icon in the lower-right corner of the dashboard, type your Intercom request, and the chat window shows the data right away.
Use Intercom’s API
The steps below show how to pull contract fields, stored as custom attributes on a Contact or Company, through Intercom’s public REST endpoints.
1. Get an access token
- In Intercom, create a personal access token with
read:contactsandread:companiesscopes. - Keep it nearby; each request passes it in an
Authorization: Bearer <token>header.
2. Locate the record’s Intercom ID
- If you already store the Intercom ID in your app, jump to the next step.
- Otherwise, use the Search endpoint:
POST https://api.intercom.io/contacts/search
{
    "query": {
        "field": "email",
        "operator": "=",
        "value": "[email protected]"
    }
}
The response includes id for the matching contact.
3. Pull custom attributes for a Contact
Make a simple GET request:
GET https://api.intercom.io/contacts/{contact_id}
In the JSON response, look for custom_attributes.
Example:
{
    "id": "63d.",
    "custom_attributes": {
        "contract_start_date": "2023-01-15",
        "contract_end_date": "2024-01-14",
        "contract_value_usd": 12500
    }
}
4. Pull contract fields from a linked Company (optional)
- Some teams keep contract info on the Company record instead of the Contact.
- Get the company ID from the contact response under
companies.
Then call:
GET https://api.intercom.io/companies/{company_id}
Read the same custom_attributes object for terms, value, renewal status, or any other fields you track.
5. Filter contacts by contract status (advanced)
Need a list of contracts expiring soon? Use a filtered search:
POST https://api.intercom.io/contacts/search
{
    "query": {
        "operator": "AND",
        "value": [
            {
                "field": "custom_attributes.contract_end_date",
                "operator": "<=",
                "value": "2024-06-30"
            },
            {
                "field": "role",
                "operator": "=",
                "value": "user"
            }
        ]
    }
}
The API returns every contact whose contract_end_date is on or before June 30, 2024.
6. Keep the data fresh
Any time a contract is signed, renewed, or canceled, update the same custom_attributes with a PATCH request:
PUT https://api.intercom.io/contacts/{contact_id}
{
    "custom_attributes": {
        "contract_end_date": "2025-01-14",
        "contract_status": "renewed"
    }
}
Staying consistent with field names avoids extra mapping later.
With these calls in place, your app or BI tool can surface contract terms wherever they’re needed.
Use Claude (via MCP)
You can pull the same data straight into Claude in just a few minutes by using the Model Context Protocol (MCP). Claude, Anthropic’s conversational AI, works much like ChatGPT.
To pull contract information from Intercom inside Claude, walk through the steps below in order:
1. Configure Torii
use the earlier Torii setup steps to connect your Intercom workspace so Torii can read your usage data.
Afterward, open the Torii Settings page and generate a fresh API key that you will provide to Claude.
2. Enable MCP in Claude
For step-by-step instructions, use the official Torii MCP guide and the related blog post on the Torii site.
After installing the Claude Desktop application, add the JSON snippet below to your claude_desktop_config.json configuration file:
{
    "mcpServers": {
        "Torii MCP": {
            "command": "env",
            "args": [
                "TORII_API_KEY=YOUR_API_KEY",
                "npx",
                "@toriihq/torii-mcp"
            ]
        }
    }
}
Replace YOUR_API_KEY with the value you generated in Torii a moment ago, then save the file.
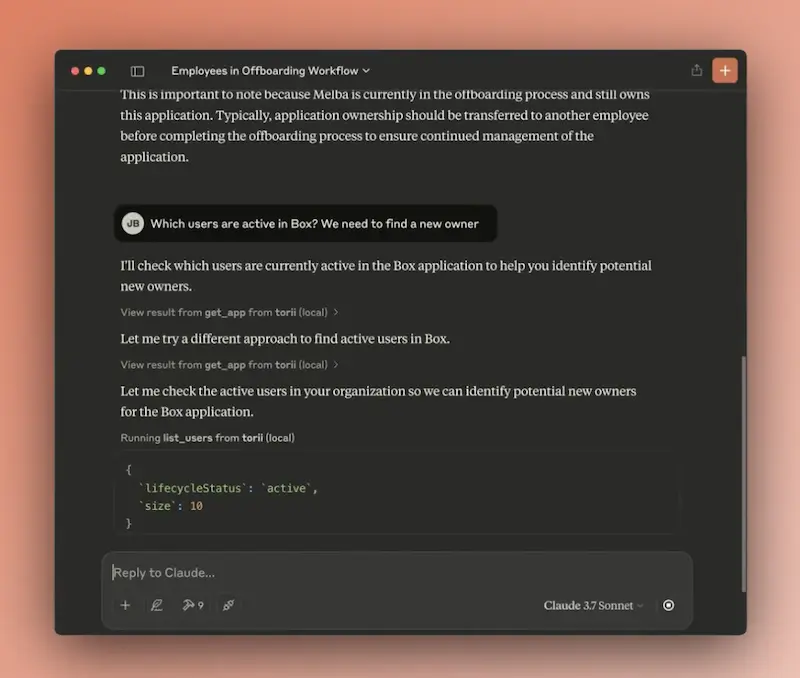
3. Chat with Claude
Once the configuration is in place, open Claude and start a conversation with your Torii environment. You can ask it to examine your Intercom instance and report back on license counts, spend totals, renewal dates, and more.
Torii for SaaS Management
Looking to dive deeper into SaaS Management across your organization? Reach out to our team. Torii’s SaaS Management Platform enables you to:
- Uncover shadow IT: Continuous AI scans run in the background and flag unapproved apps the moment they show up.
- Reduce spend: Identify unused licenses and overlapping tools, then reallocate or cancel them before the next invoice hits.
- Automate employee lifecycle: Onboarding and offboarding workflows run themselves, saving time while preventing access mistakes.
- Receive renewal reminders: We surface every contract date early, so surprises never reach your mailbox.
Torii brings Finance, IT, and Security teams together around one accurate SaaS inventory.
See the full platform in action at Torii.
Frequently Asked Questions
You have four fast options: open Billing › Overview inside Intercom, display custom attributes on the user or company profile, apply tags that surface key terms in chat, or pull contract dashboards and reports through Torii and Intercom’s API—no context-switching required.
The Billing Overview shows your plan name, add-ons, seat count, and a usage bar for each line item. In the upper right, the “Next invoice” box lists the upcoming bill date, amount, and whether you are on a monthly or annual cycle.
After you connect finance feeds and upload contracts, Torii consolidates spend, seat counts, and renewal dates for Intercom. Its dashboard highlights overages, its AI flags unused licenses, and automated reminders alert Finance or IT before any renewal hits.
Create a personal access token with read scopes, then GET /contacts/{contact_id} or /companies/{company_id}. Contract dates, value, and status live inside the custom_attributes object, which you can search, filter, or update with standard Intercom REST calls.
Eko is Torii’s built-in chat assistant. Click the icon, type a plain-language question like “Intercom renewal date,” and Eko instantly returns seat counts, spend totals, or next-invoice information pulled from your linked Intercom contract record.
Generate an API key in Torii, add it to the mcpServers section of your claude_desktop_config.json, then restart Claude. The chatbot can now query Torii via MCP and answer questions about Intercom licenses, spend, or renewals inside the same conversation.
