3 Ways to Monitor User Activity in Miro in 2026

Keeping a Miro board humming is easier when you know who did what, and when. Activity logs reveal patterns, stop mistakes from slipping through, and help facilitators steer workshops with confidence.
Yet some of Miro’s tracking tools sit in plain sight, and the right one changes with the job, routine boards, live workshops, or org-wide governance. We’ll unpack three methods so you can choose the oversight that fits your workflow without slowing creativity.
Table of Contents
Use Miro’s UI
Here, you’ll use Miro’s own tools to see who did what and when inside your boards.
Step 1: Open the board you care about
- Sign in, then select your board from the dashboard.
- Give it a moment to load so the tracking tools register everything.
Step 2: Pull up the Activity panel
- Find the clock-shaped Activity icon near the bottom-right corner of the board.
- Click it; a side panel opens and lists every action in reverse order.
Step 3: Read the timeline
- Each line shows the teammate’s name, the action (for example, added sticky, moved frame, deleted object), and a time stamp.
- Scroll up or down to move through the timeline.
Step 4: Filter or search for specific users or objects
- Click the funnel icon at the top of the Activity panel.
- Select one or more users, dates, or object types.
- The list updates right away, making it easier to spot key changes.
Step 5: Jump back with Time Machine
- Still in the Activity panel, hover over any entry and click the Play arrow.
- The board snaps to the exact moment that change happened.
- Use the left and right arrows to step forward or backward, or click the blue Restore button to return the board to that state.
Step 6: Check last-seen info for every user (Team or Company Admins)
- Open the left-side menu and choose Team settings (or Company settings for Enterprise).
- Click Users. A table shows Last Active dates beside each person.
- Sort by that column to see who hasn’t logged in lately.
Step 7: Dive into Audit logs for deeper tracking (Enterprise only)
- From Company settings, select Audit logs.
- Pick a date range, event type (login, board access, export, and more), and the user name if needed.
- Click Apply; results appear quickly.
- Hit Export CSV when you need a spreadsheet copy for your records or security team.
Use Torii
Built-in Miro analytics tell only part of the story about how teams use the tool. With Torii, a SaaS management platform, you can view Miro data next to every other subscription in one clean dashboard.
To view Miro usage directly inside Torii, follow these steps:
1. Sign up for Torii
Reach out to the Torii team and spin up a free 14-day proof of concept.
2. Connect your Miro account to Torii
After Torii is running, connect your existing Miro workspace. Full instructions live here: Miro integration instructions.
3. Search for Miro within Torii
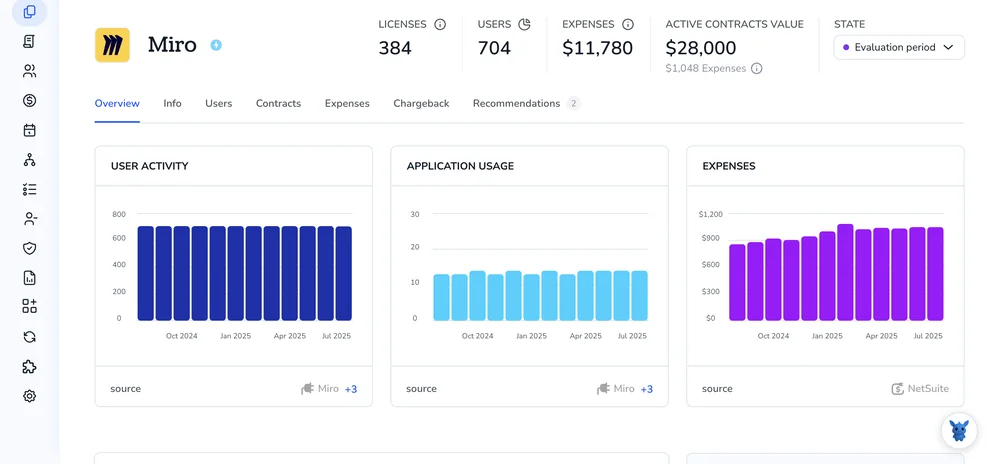
In Torii’s search bar, type “Miro” and open the result. The overview page shows license counts, spend, renewal dates, and other metrics you need for an audit.

Or, chat with Eko
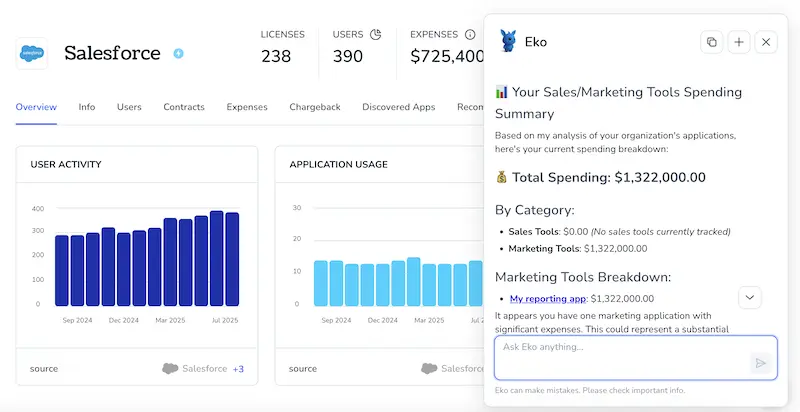
Need a quick way to pull Miro details from your Torii dashboard? Open Torii’s AI helper, Eko, hit the icon at the lower-right, type “Find Miro information,” and Eko will surface the data right away.
Use Miro’s API
This guide shows how to stream real-time board activity using Miro’s Webhooks API.
1. Get an access token with the right scopes
- Your existing OAuth flow still works.
- Make sure you ask for
boards:read,team:read, andwebhook:write. - Store the access token; you’ll send it in the
Authorization: Bearerheader.
2. Pick the events you care about
Common user-activity events in Miro’s docs:
board.member.joined(someone opens or is added to a board)board.member.leftboard.widget.created,board.widget.updated,board.widget.deletedboard.comment.created
Write them down because they go in the next step.
3. Create a webhook
Register each webhook by sending a POST request to https://api.miro.com/v2/webhooks, including the JSON payload shown below.
curl -X POST https://api.miro.com/v2/webhooks \
-H "Authorization: Bearer $MIRO_TOKEN" \
-H "Content-Type: application/json" \
-D '{
    "event": "board.widget.created",
    "boardId": "uXj123abc=",
    "callbackUrl": "https://yourserver.com/miro-events",
    "description": "Track new widgets"
}'
Create a separate webhook for every event type you noted earlier, and keep the returned id handy for renewals.
Miro replies with a webhook id and an expirationTime (30 days by default).
4. Complete the verification handshake
Miro immediately calls your callbackUrl and includes a JSON payload containing a single challenge value. Send an HTTP 200 response that echoes that exact string, which completes the verification handshake and tells Miro your endpoint is ready.
app.post('/miro-events', (req, res) => {
    if (req.body.challenge) {
        return res.status(200).send(req.body.challenge);
    }
    // Handle real events below
});
5. Parse incoming events
Once verified, every subsequent POST from Miro carries a JSON event payload structured like this. Fields may vary by event type, but the common keys shown below remain consistent across the API.
{
    "event": "board.widget.created",
    "createdAt": "2023-10-12T15:04:02Z",
    "data": {
        "widgetId": "307445736123",
        "createdBy": { "id": "345678912345", "name": "Jada Lee" },
        "boardId": "uXj123abc="
    }
}
Grab data.createdBy.id to know who acted and createdAt for the timestamp. Put what you need in your database, analytics tool, or log file.
6. Refresh the webhook before it expires
Schedule a renewal a few days before expirationTime so the subscription stays active. The simple PATCH request below resets the clock without forcing you to create a new webhook.
curl -X PATCH https://api.miro.com/v2/webhooks/$WEBHOOK_ID \
-H "Authorization: Bearer $MIRO_TOKEN" \
-H "Content-Type: application/json" \
-d '{ "status": "active" }'
Or delete and recreate if you prefer.
7. (Optional) Enrich the data
If you want full user details for reports or alerts, fetch them separately:
GET /v2/users/{user_id}
Combining that metadata with the event stream gives stakeholders readable activity logs and reduces follow-up lookups later.
8. Keep it tidy
Clean-up tasks prevent noise and unexpected charges on your account. The bullets below outline the small but important housekeeping actions to add to your deployment checklist.
- Remove webhooks you no longer need:
DELETE /v2/webhooks/{id}. - Handle retries; Miro will resend up to five times if your server returns anything but 2xx.
- Log every incoming
event idso you don’t process duplicates.
You’re now collecting live user activity straight from Miro, ready to power dashboards, alerts, or audits without ever opening the Miro UI.
Torii for SaaS Management
Looking to sharpen your SaaS management approach and cut hidden costs? Torii’s SaaS Management Platform helps you with the heavy lifting so you can focus on bigger initiatives:
- Uncover shadow apps: Our AI scans your environment in real time and flags unsanctioned tools the moment they appear.
- Slash software spend: Spot idle licenses and overlapping apps, then retire them to keep spending tight.
- Automate onboarding and offboarding: Kick off zero-touch workflows that lift repetitive chores off IT’s plate and stop mistakes before they happen.
- Stay ahead of renewals: Get renewal reminders in time to negotiate, so critical contracts never slip through the cracks.
Torii unites Finance, IT, and Security teams with one reliable view of every SaaS application in use.
Learn how Torii can streamline your stack by visiting Torii.
Frequently Asked Questions
You can monitor board actions three ways: open Miro’s Activity panel for a timeline and Time Machine, pull company-wide Audit logs (Enterprise), or connect the Webhooks API to Torii or your own server for real-time events—choose whichever fits your workflow.
The Activity panel lists every action in reverse order, showing teammate names, object changes such as added stickies or moved frames, plus precise timestamps. You can scroll, search or filter by user, date, or object type for quick audits.
Time Machine lets you hover over any Activity entry, hit play, and watch the board jump back to that exact moment. You can step forward or backward, then restore the board state, making it easy to undo errors or review progress.
Torii aggregates Miro usage with the rest of your SaaS stack, revealing license counts, spend, renewals, and idle seats in a single dashboard. Its AI assistant Eko can surface data instantly, helping IT, Finance, and Security trim costs and enforce governance.
Common Webhook events include board.member.joined, board.member.left, board.widget.created, board.widget.updated, board.widget.deleted, and board.comment.created. Capturing these events streams who entered, changed, or discussed content, giving developers real-time feeds for dashboards, alerts, or compliance logs.
A Miro Webhook lasts up to 30 days. Schedule a PATCH renewal a few days before the expirationTime to keep the subscription active, or delete and recreate it. Regular renewals prevent data gaps and avoid manual reconfiguration.
